


Maka and I have been struggling with the task of making meals for our family. Not because we donʻt like eating or cooking (WE DO) but since quarantine the struggle has been thinking of whatʻs for BD&L (breakfast, lunch and dinner) EVERY DAY for EVERYONE in our family of 4. Because weʻre all stuck at home and hungry!! Seriously itʻs been tough with two little ones whose appetites grow and change every day.
To lessen our stress, Iʻve been trying to incorporate meals that can feed the whole family instead of making 2 different meals at a time (1 for kids and 1 for adults). I found that I can make a simpler, less salty version for the kiddos and put aside before finishing up our half of dinner with extra sauce or seasoning.
We are also trying to brainstorm menu ideas on Sundays for the week. So we know what we need on store runs and what meats to defrost. One of my favorite mompreneurs Joanna Gaines has a blog post about this and even offers a cute printable menu/ shopping list for the week here.

To help with meals I’ve turned to my instant pot and air fryer A LOT. Do any of you find these tools as useful as I do? I’m especially obsessed with my instant pot. Click here to find one for yourself! Iʻve also switched all of my pots and pans in my house to PTFE, PFOA, and Cadmium free cookware like this pan or a set like this. Life changing and better for everyone in my ‘ohana.
Probably one of the most surprising new things to our family is gardening. The biggest pay off is incorporating those herbs or veggies into our recipes. Itʻs rewarding and somehow tastes way more delicious than the store bought stuff. I have no tips on gardening though, Iʻm surprised theyʻre growing so well. But I can take no credit for it. Good job dada Maka!
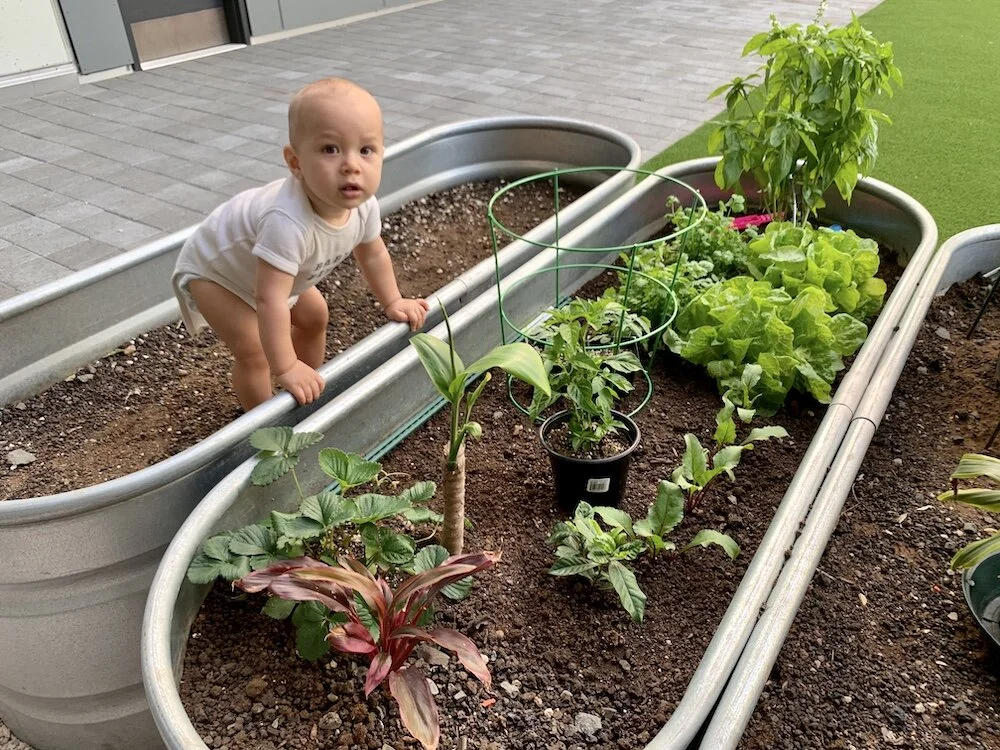
Our garden is not that big but packs a punch! We have Hawaiian chili peppers, basil, cilantro, lettuce, strawberries, beets, and even some lāʻī (t leaf) and a gardenia plant starting!
At the end of the day, we just want quick, delicious, and at least semi healthy meals that keep us full longer so we can cook less and enjoy more time with each other… or apart reading books, coloring, shopping online… whatever works lol! I gathered a few of my favorite recipes of the moment from cooking shows and online that fit into our familyʻs lifestyle and wanted to share them with you.
OH and if youʻre like me and like to watch cooking shows and movies while you cook hereʻs a few of my favorites!
Bulletproof Coffee
Because our day begins with coffee. But this version provides more quality fats and brain power for you!
Discovered from: My doula Piper Lovemore. Hereʻs the original recipe link.
My customizations: Vegan substitutes- coconut oil instead of butter. Coconut milk/creamer instead of regular milk. I used a plant based protein that had cacao powder in it. I got this and the coconut oil from costco. Iʻve used this Green Superfood in chocolate cacao flavor in the past that was pretty good too. Also I just eyeballed on the measurements until I found the portions I liked. It still goes down like coffee, but it packs way more nutrition, and it’s gentler in your system.
Ingredients
coffee
milk
quality butter like Kerrygold or coconut oil
sweetener (sugar, honey, or for extra credit dates!)
whole food supplement or protein (optional)
cacao powder (optional)
powdered ʻolena/ turmeric (optional)
Method
To a blender add coffee, coconut milk, coconut oil or good quality butter (Kerrygold), and sweetener.
Blend it up to a frothy decadent latte.
You can add some superchargers like cacao powder, powdered olena, and a whole food supplement.
Enjoy!!
Recipe Tips
You can make hot ( I make sure my coffee is extra hot to start with) or add ice for a cold treat. You can add ice at the end or blend some in!
Egg, Cheese, and whatever-else-you-have-in-the-fridge Roll UPs
I am not a big breakfast person and I donʻt like eggs. But since Iʻve discovered this recipe even I canʻt resist eating it and my whole family loves it! We can make a simple egg and cheese version or dress it up for ourselves like we did in the video.
Discovered on: Netflix- Nadiyaʻs Time To Eat Hereʻs the direct Recipe Link.
Our customizations: We used whatever we had on hand- fresh cilantro from our garden, fresh onion and garlic minced, Sun-dried tomatoes from the jar, and a cheese blend. We sauteed the veggies before putting in.
Ingredients
6 free-range eggs
1 tbsp dried parsley
1 tsp garlic granules
½ tsp salt
½ tsp black pepper
oil, for frying
6 small tortilla wraps
85g/3oz sliced black olives (drained weight from 185g/6½oz jar)
100g/3½oz fresh, frozen or tinned button mushrooms, sliced (optional), defrosted if frozen
6 tsp sun-dried tomato paste
Method
Crack the eggs into a bowl, then add the parsley, garlic granules, salt and pepper, and give everything a good mix.
Put a small frying pan over a medium heat, and drizzle in two teaspoons of oil. Take the time at this stage to peel the tortillas away from each other.
Put the olives into a bowl, and the sliced mushrooms, if using, in another bowl, and have both nearby. Pour 3 tablespoons of the egg mixture into the pan – the eggs should sizzle, but if they don’t, turn the heat up a little.
Scatter a few olive slices and mushrooms onto the wet egg mix.
Take a tortilla wrap and spread it with a teaspoon of sun-dried tomato paste. Quickly put the tortilla on top of the egg, paste-side down. While the wrap and egg are cooking, get the next wrap ready and spread with the paste.
Using the back of a slotted spatula, press the top of the tortilla to help distribute the egg under the wrap. Cook for no more than 30 seconds, then, as soon as the egg has glued itself to the tortilla, flip over and cook on the other side just to warm it through for another 30 seconds.
Take the pan off the heat and put the tortilla/egg on a plate. Roll the whole thing when it is cool enough to touch. Do the same with the rest of the wraps until the egg is used up. Serve.
Recipe Tips
This dish freezes well. Wrap any leftovers in cling film and pop them into the freezer. When you are ready to eat the leftovers, leave to thaw in the fridge.

Pasta Bolognese
We love pasta! Plain with butter and parmesan cheese or dressed up with bolognese sauce. Itʻs super filling and delicious.
This recipe changes depending on what we have in the fridge. Which is why I love pasta because itʻs so versatile. Itʻs one of our familyʻs favorites to eat for dinner… and again for lunch as leftovers… and then again for dinner. We make a side of garlic bread of course.
Ingredients
1 medium onion, chopped
minced Garlic to taste (you can use the pre-made stuff in a jar)
3 Tbsp. extra-virgin olive oil or butter ( I mix in both)
1 lb. ground beef (I used Kaunamano farm Hawaiʻi island grass fed beef)
1 lb. ground pork (I used Kaunamano farm pasture-raised birkshire pork)
Kosher salt, Garlic salt or Hawaiian salt
1/2- 1 cup red wine (optional) I use whatever I have on hand and always make sure you have enough for a glass.
⅓ cup tomato paste (optional)
1 or 2 jars of pasta sauce (sometimes I only have 1 half used jar in fridge and Iʻll mix it with a new jar or some regular tomato sauce in the can)
1 bag pasta
2 oz. finely grated Parmesan (about ½ cup), plus more for serving
Method
Dice onions and mince garlic
Heat oil in a large pot over medium. Break beef and pork into small clumps and add to pot; season lightly with salt*. Cook, stirring occasionally until meat is lightly browned but not crisp, about 6–8 minutes. It may be gray in spots (that’s okay!) and still a little pink in the center. Using a slotted spoon, transfer beef to a medium bowl. It will cook more in the sauce.
Wipe out pot. Heat butter on medium then add onion to pot and cook for 3-5 mins.
add garlic, stirring occasionally, until vegetables are very soft and translucent, about 6–8 minutes.
Add tomato paste in here if you want and let cook for a few mins**. Then Return beef to pot and pour in wine. Reduce heat to medium-low and cook, smashing down on beef with a wooden spoon, until wine is mostly evaporated.
Add sauce from jar.
Taste sauce and adjust seasoning with salt; keep warm on simmer.
Cook pasta in a large pot of boiling salted water. I like to use Hawaiian salt. A little goes a long way. If using fresh pasta, cook about 3 minutes. If using dry, cook until al dente, follow time on package or go under the time by a minute or 2. Reserve a coffee mug of pasta water just before pasta is done.
Using tongs or slotted scooper, transfer pasta to pot with sauce.*** Add up to 1 cup pasta cooking liquid and ½ cup Parmesan. Increase heat to medium, bring to a simmer, and cook, tossing constantly, until pasta is al dente and liquid is slightly thickened, about 2 minutes.
Transfer pasta to a platter and top with more Parmesan.
Do Ahead: Sauce can be made 4 days ahead. Cover and chill.
Recipe Tips
*If youʻre using salted butter or sauce from jars use less salt when seasoning meat. You can always add more salt later.
**By letting tomato paste "brown" in the pan, and sautéing it with spices and other aromatic ingredients like cooked onions, you can boost the flavor of your dish in a big way. More on cooking with tomato paste here.
*** We put some plain pasta on the side to serve our kids with butter and parmesan. 1 meal two ways, score!
Strawberry Shortcake
Every year for Makamaeʻs birthday I make him a strawberry shortcake. Itʻs a tradition his mom started with him when he was little. Heʻs requested it for every birthday since. We just celebrated Makaʻs bday on 4/27 with a zoom party and this cake! Best part was I had ʻŌmea help me make dadaʻs cake this year.
Discovered from: My favorite childhood cartoon and then later from Makamaeʻs mom
Our customizations: We used whatever we could find at Whole Foods which is the closest store to our house. Yes we had to shop at Whole Foods during quarantine! So it was a little different this year because I ended up using Gluten free yellow cake mix and Miss Jones Organic Cream Cheese Frosting. The frosting was actually delicious but it got hard in the fridge. Next time Iʻll just stick to the cool whip frosting which is actually called Tru Whip at Whole Foods. I actually loved it so much.
Ingredients
1 container of strawberries
1-2 tbs Sugar ( I used coconut sugar from Costco)
1 box of yellow or white cake mix plus water, vegetable oil and/or eggs as called for on cake mix box. Maka’s mom adds 2 tablespoons of mayonnaise to white cake mix to make it fluffy.
2 containers of Cool Whip or Tru Whip
Method
Make your cake. Preheat Oven. Follow instructions on cake mix box.
Use two small circle pans or one large 9 x 13 in pan. Whatever you have. I like this one because itʻs ceramic coated copper and PTFE/PFOA Free. Make sure to grease the bottom of your pan.
Let the cake cool down on a cooling rack in the pan.
Wash and cut strawberries into slices and put in a bowl with sugar. Place covered in fridge until you need it.
When the cake is cooled down completely* transfer it to a cake board/ serving plate. Make sure itʻs something big enough to hold the cake. I used a big glass cutting board. I placed my cutting board on top of the cooled pan and flipped the cake over**. Then I cut it in half in order to make two layers. If you used two circular pans you will flip one onto your serving dish to start the first layer.
Cover your first layer with cool whip or frosting.
Then add half of your sliced strawberries onto the cool whip or frosting.
Add your second layer of cake on top of the strawberries. Some people cut a bit off the top of the second layer so it lays flatter on the cake. I donʻt wanna waste any cake so I keep it rustic and just pile the second layer on as is.
Repeat steps 5 & 6 on the top layer.
Cut & Serve it up! Bon apetit!
Recipe Tips
*I suggest making the cake earlier in the day so it has time to cool. You want the cake cool before cutting it and adding any cool whip or frosting on top.
**Hereʻs how to get your cake out of the pan without having it fall apart.
You can also precut your strawberries, add sugar and leave in fridge to soak and get chilled ahead of time.
Place Cool Whip/ Tru Whip in the refrigerator so itʻs ready to use when you need it.